Directory skeleton
I'll be using On-Screen Keyboard as an example to describe the overall skeleton directory structure. Consider this image below:
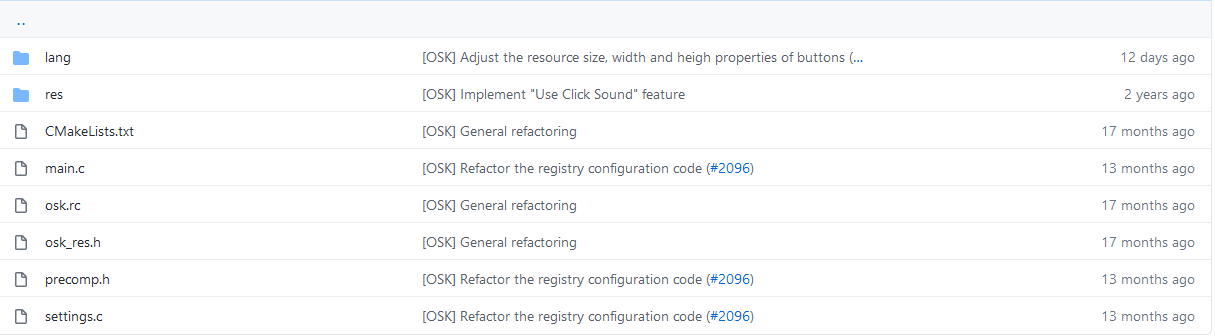
Leaving other stuff aside that's only related with the program in question, by standard every built-in software must come with a CMakeLists file, lang and res directories,
a main resource file for including translation files and a precompiled and resource headers. lang is the directory that contains the translation files, res contains resource based files such as icons, sound WAV files and whatnot.
CMakeLists is a text document file containing CMake command directives that instruct CMake to automate the building procedure of files. I'll stumble upon later how to set up a
CMakeLists file.
osk.rc is the main resource file that I was talking about above, which is used to define the rest of translation files from lang directory. Each application has this file with its
own name, otherwise it's named as rsrc.rc. Finally, here they come the resource and precompiled headers. The resource header (osk_res.h) is used to store the IDs necessary
for the resource controls such as text, buttons, menu items, combo boxes an so forth. The precompiled header, as the name implies, is the primary header of an application that can be processed faster by the compiler. As a general rule it's advised to
create a precompiled header for your own program in case you have other several application specific headers in your source code. The default name goes by precomp.h.
Write your program
🢂 Set up the directory & add it to CMakeLists
As a first step to create our small program is to, without doubts, make a directory for it within the path base/applications. I'm going to name such program as "Simple Program" and the
directory as "simpleprogram". Within the applications directory there's a CMakeLists file used to list all the application folders and the next step is to actually add our program on that file too.
Keep in mind the list is ordered in lexicographic order and as such you must check where does the program directory stand. With that said, you should end up like in this screenshot.

🢂 Prepare the program files
Now it's time to prepare the necessary files for the program, as shown in the screenshot below:

Without going too much in detail, here's a summarised explanation of what's told above regarding the skeleton structure of a built-in program:
lang -- Language translation files directory;
res -- Multimedia resources directory (icons, sound files, etc.);
CMakeLists -- Text file with CMake commands for build automation of the program;
main.c -- Main C source code file of the program;
precomp.h -- Precompiled header;
resource.h -- Resources header;
simpleprogram.rc -- Main resource file of the program.
That's all needed for our program. Additionally one could create a directory, include, to hold eventual program specific headers in case one ends up developing a big program.
As a general rule all the program specific headers from that folder must be included in the precompiled header!
🢂 Make a translation file & set up control IDs & include the translation in the main resource file
Resources are what they make up the GUI aspect part of a program. Examples of resources are the buttons, text, caret, combo boxes and whatnot. Besides that, the advantage of such
resources namely the text controls can be translated into various languages thanks to the MUI technology of Windows (and ReactOS as well). From this point and beyond the coding style
and guidelines shall be respected, please take a look at the coding style rules if you haven't done it so.
First I'll start by defining some resource controls for our program. Every resource controls has its own ID unique for the control so that the resource control itself can be
manipulated through various of ways based on the ID itself, such as, displaying or removing a static text control by giving its ID. This should be done in resource.h,
as you can in the screenshot as follows:
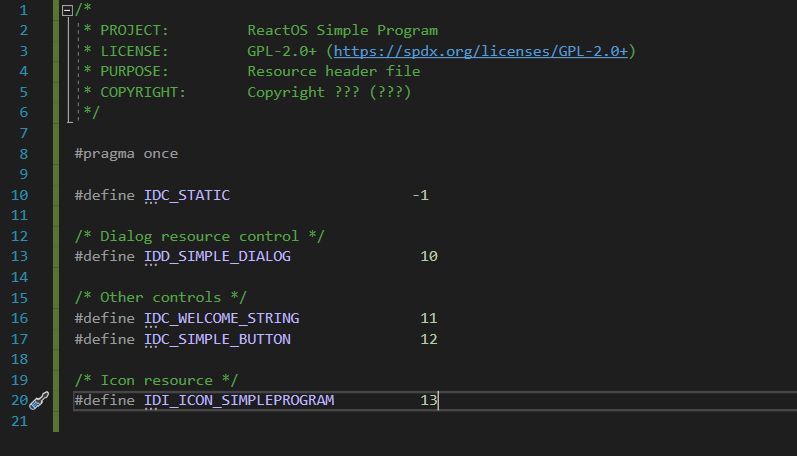
#pragma once tells the compiler that the header must be included only once during the compilation of the source. IDC_STATIC is the static control used
for static text, whereas IDD_SIMPLE_DIALOG will be our control ID used for our dialog box of the program. IDC_WELCOME_STRING and IDC_SIMPLE_BUTTON
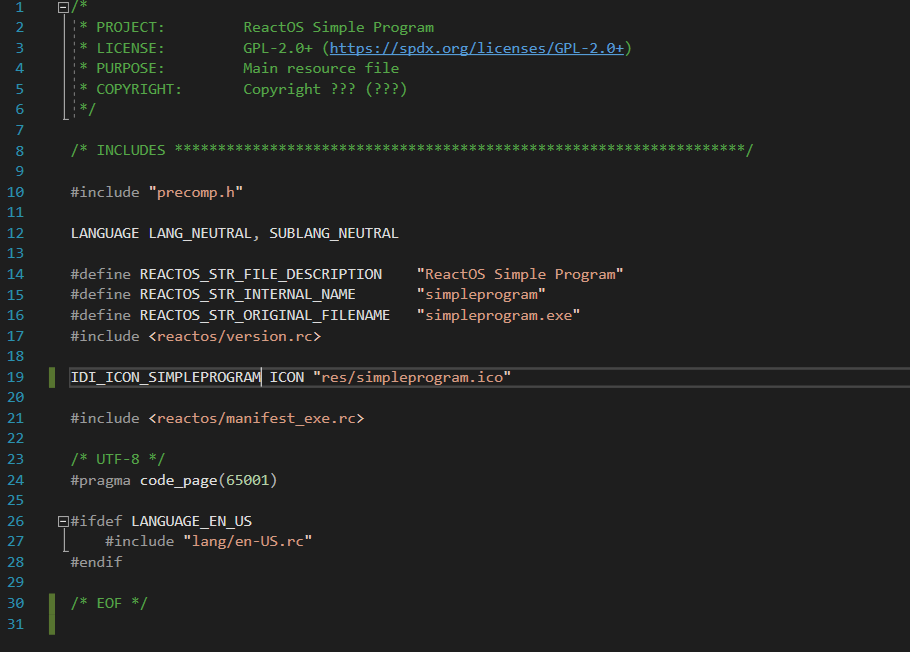
are the other controls needed for our dialog. Finally, IDI_ICON_SIMPLEPROGRAM will be our control ID for the icon. It's worth noting the icon must be 16x16 in size and .ico as filename extension type.
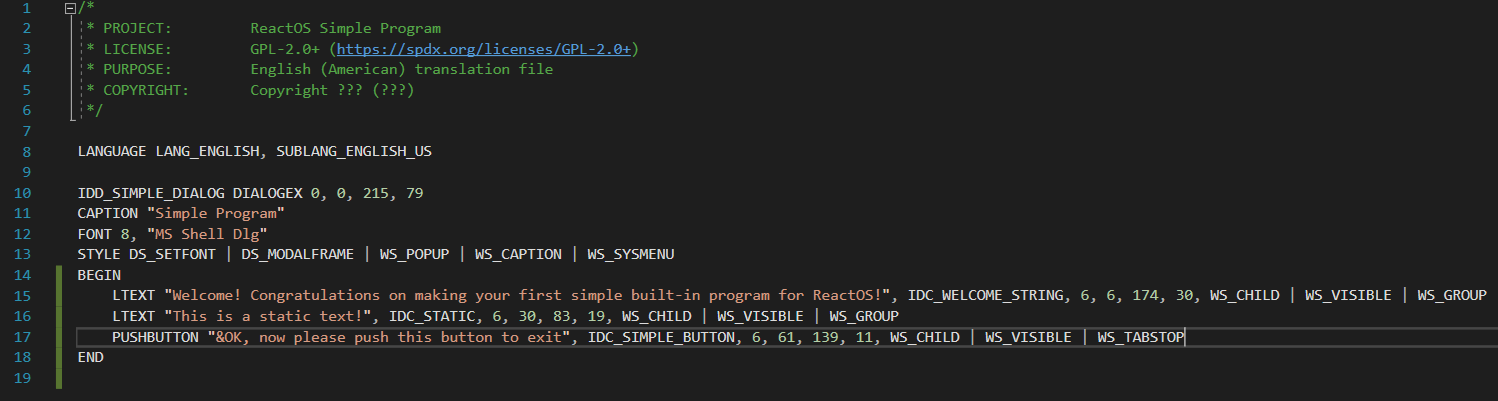
Now that we defined the control IDs, it's time to create a translation file and include it within the main resource file. The translation file must be in the lang directory.
For more information about the controls in Windows/ReactOS, consult my article about translating ReactOS and the MSDN documentation.
Afterwards, we must include the translation file in the main resource file which is our simpleprogram.rc, as follows:

The first three ReactOS related constants, REACTOS_STR_FILE_DESCRIPTION, REACTOS_STR_INTERNAL_NAME and REACTOS_STR_ORIGINAL_FILENAME define
the basic information of the program such the internal string name, original file name and whatnot. Such constants are used, for example, when you check at Properties > Details
dialog applet. Furthermore, the 65001 value denotes the UTF-8 code page identifier telling the compiler that UTF-8 has to be used. And finally, we include our translation file.
🢂 Set up a CMakeLists file
The next step is to set up our CMakeLists file for the program, which should go along the lines like this:
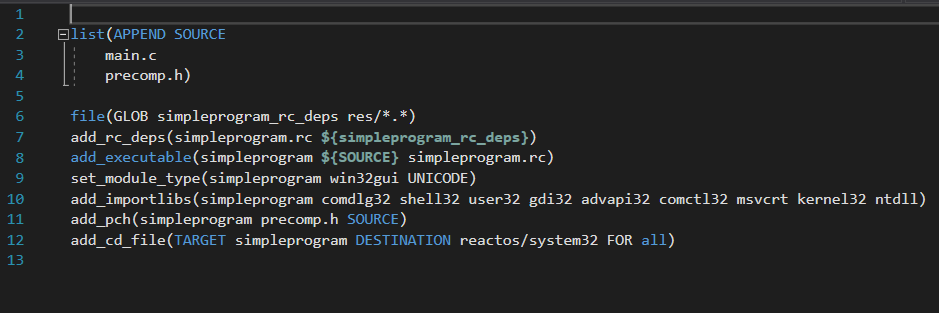
It can be confusing at first but I'll explain part by part what these commands mean. Bear in mind that only two commands are coming from CMake itself (list and add_executable), whilst the rest are ReactOS related.
list -- What it simply does is to list the source files by appending them into a variable, named SOURCE. This helps CMake understand the structure of our program;
file -- Generates a list of files based upon the specified path pointed in the third parameter, res/*.*;
add_rc_deps -- Adds the resource dependencies. The first parameter points to the main resource file whereas the second one points to a variable that's being created previously with the file command;
add_executable -- Creates the executable target. The second and third parameters point to the source paths needed to for the executable. The first parameter is the name of our executable target to be created;
set_module_type -- Defines the module type of the program. win32gui indicates the executable is a Win32 GUI subsystem program and UNICODE instructs CMake that the program is Unicode aware;
add_importlibs -- Imports the entry points from the user mode libraries for the program;
add_pch -- Adds the precompiled header into the target;
add_cd_file -- This command instructs CMake how the executable target should be shared to the build. TARGET is the executable target point which CMake takes, with DESTINATION
telling CMake that the destination path for the executable to be compiled should be at reactos/system32. FOR all means that CMake will automate the build process on preparing
the executable program for both builds, LiveCD and BootCD.
🢂 Prepare the precompiled header
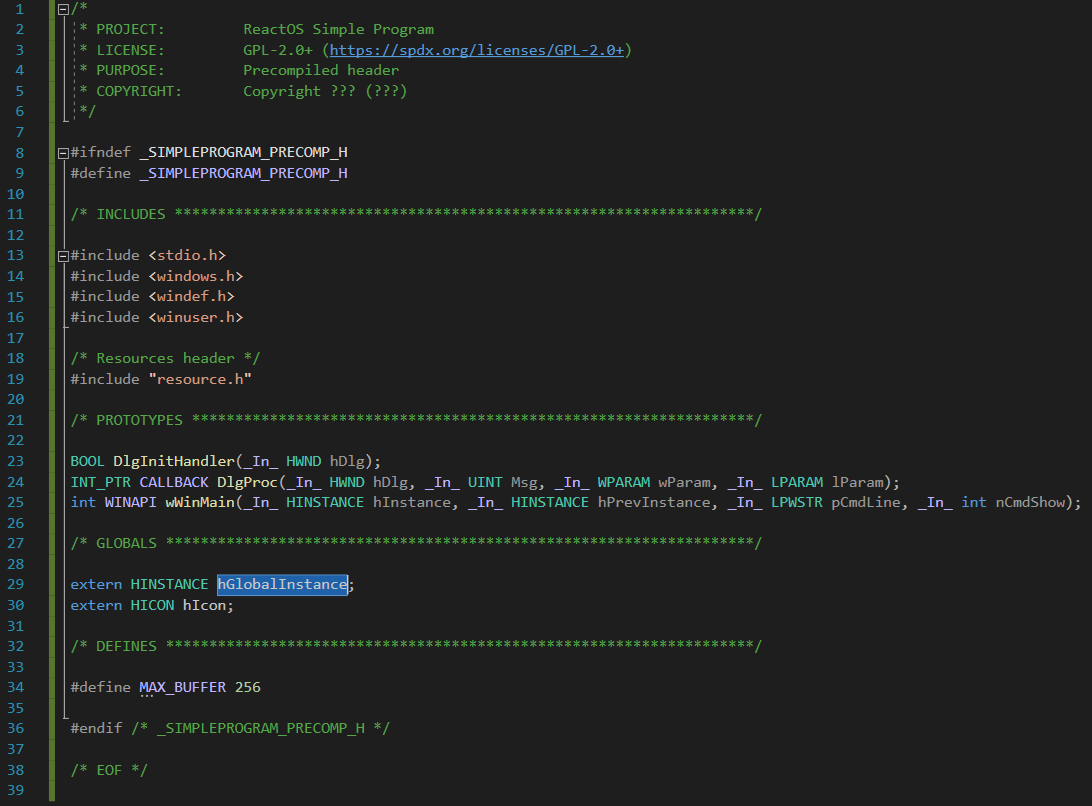
Regarding the precompiled header, what we'll include are some basic Windows API headers, the standard C I/O library, the resource header with the control IDs, function prototypes and whatnot.
You should end up with a header like this, more or less:
🢂 Write the main source code file
We're almost here, what's needed to do in the next step is to write the main source code of our program now that we finally set up the precompiled header with the basic stuff, CMakeLists file,
the translation file and such. First we'll start by including the header and initialise the global variables that we'll be using them later for other stuff. With that said, you should end up like
this:

As stated previously, our goal is to create the program as a simple modal dialog box. Modal dialog boxes are windows but with the sole difference that user input is required to continue further
with a certain operation, an example of such a modal dialog box is "Save As" dialog. We need to write a function for dialog handling initialisation, for the mere sake of wrapping the code in a function
instead of writing it directly to the WM_INITDIALOG window case message, for readability purposes. The function code should look as follows:

What does this function do is basically centering the dialog at the center of the screen, extracts the icon handle from the instance memory of the program and displays it to the non-client
area of the dialog. There's no definite rule for how a dialog code initialisation should be, one can simply return TRUE in WM_INITDIALOG as is. Afterwards, we must
write the dialog procedure function code that deals with message pumping. The code should look as follows:

Pretty basic and simple, considering the fact we don't do anything complex or advanced with our program. The dialog procedure mostly handles the message pump being sent and received by
the window manager of Win32k, the USER. Finally, we must write the entry point of the program that looks like this:
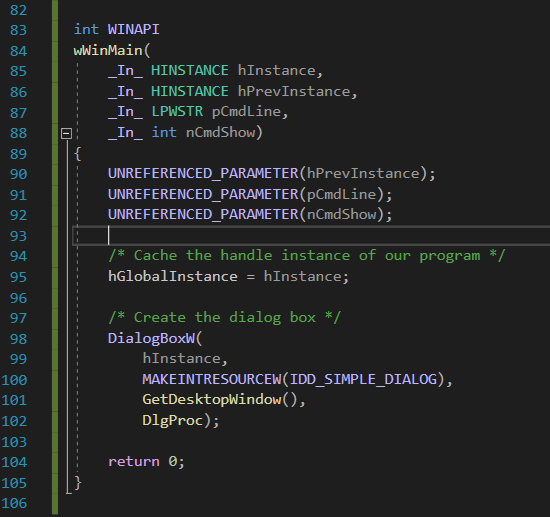
wWinMain is like the equivalent of main in the standard tenets of C but with the difference that wWinMain is reserved solely as an entry point for a
Windows/ReactOS user mode program. The only operation that we do here within the entry point is to cache the instance of the program loaded into the memory space in a global variable and display the modal dialog
box with DialogBoxW, a function call exported for use by user32.dll library. All in all, the whole snippet of code should look like this (and the precompiled header code).