ReactOS Icon

 ReactOS Tutorials

 How to translate the 1st stage setup component

 << Go Back


 Table of Contents

  1. Introduction
  2. MUI design in USETUP
  3. Translating USETUP
  4. Compiling translations

Introduction


What you've learnt in the past is how to translate ReactOS (built-in applications, DLLs, et al) by interacting with resource files of the project, however, translating the 1st stage setup component (or internally named as USETUP) is quite different from the general way of translating the project in your language. With that said, in this tutorial I'll be showing you how to translate USETUP and compile the translation.


MUI design in USETUP


What makes the translation between other ReactOS modules and USETUP different is the MUI (Multilingual User Interface) internal implementation differences. In ReactOS, or rather specifically within the Windows subsystem environment, the user mode software as well as any other module that use resource controls (e.g. static texts, combo boxes, dialog boxes, bitmap images, et al) are encapsulated in a file with filename extension format as .rc (which stands for, without a doubt, resource control). Such resource files are handled by MUI which in turn such interface is handled by Win32k, the kernel frontend of Windows subsystem environment. This makes the process of translating modules of the ReactOS project easier for translators. For more information how to translate ReactOS, please consult this article.

Although considering the fact that USETUP is a native application module, that is, the application links directly against the Native API (the NTDLL library) and doesn't use or depend on any other Windows subsystem environment related libraries such as USER32.DLL, GDI32.DLL and so forth it is pretty obvious that it can't use the resource controls of the Windows subsystem. And here's where USETUP comes up with its own MUI implementation. Keep in mind I don't intend to dive too deep into the MUI internals of USETUP as I'll only explain the basic details of the MUI design in USETUP to make it clear for people who want to translate USETUP before actually translating this component in the first place. With that said, let's get started.

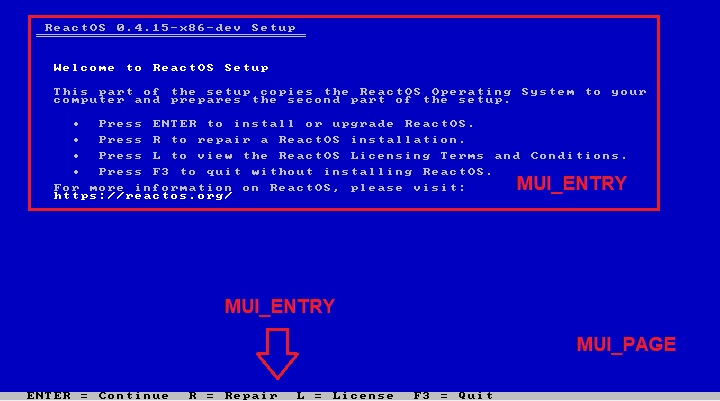
The MUI bases upon the concept of pages and entries. A page is basically the very whole portion of the screen with entries being the actual contents within a page. Strings and error strings are the subset of an entry in a page. Such concept that represents the actual functionality under the hood of MUI is implemented based upon the data structures declared in this header (mui.h).

typedef struct
{
    SHORT X;
    SHORT Y;
    PCSTR Buffer;
    DWORD Flags;
    INT TextID;
} MUI_ENTRY, *PMUI_ENTRY;
         

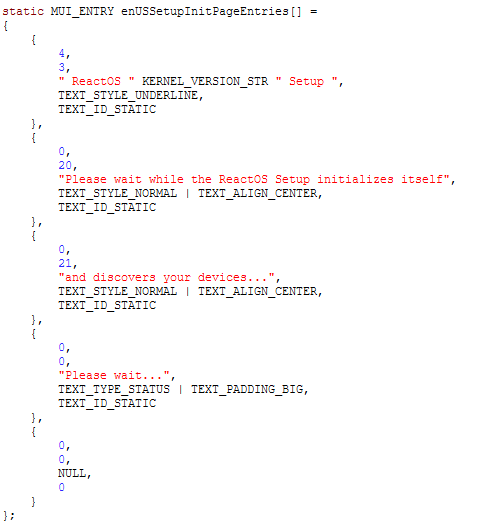
X and Y are the coordinate points of the text, Buffer is the actual buffer string that represents the actual text, Flags denotes the MUI text style flags that change the appearance of the said text itself of an entry (such as TEXT_STYLE_NORMAL flag which denotes a normal text and so on) and TextID is the unique ID that represents the entry.

typedef struct
{
    LONG Number;
    MUI_ENTRY * MuiEntry;
} MUI_PAGE;
         

As for pages, a page is identified by a number ID, Number, and MuiEntry is the entry in the page. It's worth noting that a page can have multiple entries.

typedef struct
{
    PCSTR ErrorText;
    PCSTR ErrorStatus;
} MUI_ERROR;
         
typedef struct
{
    LONG Number;
    PCSTR String;
} MUI_STRING;
         

As I've told above, strings and error strings are the subset of an entry that operate independently and are declared by their respective data structures on their own. ErrorText is the error string in question and ErrorStatus is the status error code that points the nature of the status error. Regarding MUI_STRING is a data structure used to denote dynamic strings, which Number represents the unique number instance of the string and String is the buffer that points to the actual string text.

typedef struct
{
    PCWSTR LanguageID;
    PCWSTR LanguageDescriptor;
    const MUI_PAGE * MuiPages;
    const MUI_ERROR * MuiErrors;
    const MUI_STRING * MuiStrings;
} MUI_LANGUAGE_RESOURCE;
         

Finally the last data structure represents the instance of a language locale, or in other words, the details that actually define the language resource as a whole. LanguageID is the locale identifier (e.g.00000809 is the ID locale for British English), LanguageDescriptor is the descriptor of a language (e.g. English (United Kingdom)) and the last three members of the data structure are the MUI contents of a language resource being the pages with respective entries, error and dynamic strings.

All in all, this is the basic and overall functionality of MUI in USETUP. Here's a screenshot which demonstrates "Welcome to ReactOS Setup" page, with entries explicitly pointed.

USETUP

Translating USETUP


 🢂 Prepare your translation file

The translation files of USETUP are located in lang directory, as you'd generally see in any other modules of ReactOS that are localised into different languages. As usual the translation files are labelled by their country ISO code (e.g. en-US for the United States of America) with filename format as a C header file, unlike the resource files which filename extension format is .rc.

As the initial step is to prepare your language translation file by copying the contents from the en-US.h file if the translation file doesn't exist in the directory sources. You'll stumble upon several lines as follows.

Entry

The variables such as enUSSetupInitPageEntries denotes the description about setup initialisation entries. The variables must have the corresponding country ISO language code so for example if I have to make a translation file for, let's say Italian, then the variable should be named as itITSetupInitPageEntries. For a list of country locale codes please check this page. If you understood the basic concepts of pages and entries of USETUP then translating should come easier for you.

As you can see in the screenshot, what you can translate are the strings wrapped in double quotes. Bear in mind however there are certain constants such as KERNEL_VERSION_STR which should kept alone! The first two parameters are the X/Y coordinate points as you may have looked at the definition declaration of MUI_ENTRY data structure. You can of course change such coordinate values accordingly. In all cases the text style flags and text IDs should be kept as they are. The next strings to translate are the error strings as shown in the screenshot below:

Error strings

This is self-explanatory, you simply translate whatever string wrapped in double quotes. The escape sequence however (\n) and special UTF-8 characters like \x07 which represents a central dot should be kept as they are! The final pieces to translate are the dynamic strings.

Dynamic strings

The dynamic strings are used on specific locations of a page where they're displayed accordingly on specific factors such as when an operation requires the user to wait then USETUP displays the Please wait... string and it gets removed from the screen once the operation has completed successfully. As the general rule, DO NOT translate the ID number constants!

 🢂 Include the translation file

The inclusion is done in the similar way as you'd include a resource file in a header, as shown in this screenshot below:

Include

And the final step of the inclusion is to define the language MUI resource.

Define resource

For a list of keyboard language layout identifiers, please check this page. The MUI pages, error and dynamic strings must correspond to their respective locale specific variables from the translation file.


Compiling translations


For your translation changes to take effect, you can either compile a boot build by typing ninja bootcd in RosBE or VS command prompt or compile the USETUP component standalone by typing ninja usetup. In the latter case in order to test your changes you've to copy the newly compiled usetup.exe native executable file located in the compiled sources path and paste into reactos\system32 directory path within the compiled ISO build and rename it as smss.exe. For this operation you must use a software such as WinISO in order to edit ISO files, you'll end up with unbootable ISO builds otherwise.